While setting up our site, we took some shortcuts by using contend delivery network (CDN) hosted resources. These CDNs are extremely convienient for initial development. The problem with using a CDN is threefold:
- If the CDN goes down (highly unlikely)
- The CDN stops hosting the resource due to it being nno longer supported
- You are developing locally and have no Internet access
The downside of locally hosted resources? You need to serve them! When an HTTP/S request comes into your hosting provider, in addition to serving the page, all required resources will need to be dished up. GitHub Pages has a soft cap of 100GB per month, per this document.
The list of libraries we’ll host locally include:
- Bootstrap
- jQuery
- FontAwesome New!
Bootstrap
Bootstrap does have instructions covering how to use SaSS to compile resources directly for your project. We’re going to take the simpler approach and add the precompiled CSS and Javascript directly to the relevant assets sub-directory.
Download the precompiled CSS and Javascript to your development system. From the zipfile, copy the following files into your project:
| Zipfile location | Project location |
|---|---|
| ./dist/js/bootstrap.bundle.min.js | ./assets/js/bootstrap-5.1.3/bootstrap.bundle.min.js |
| ./dist/js/bootstrap.bundle.min.js.map | ./assets/js/bootstrap-5.1.3/bootstrap.bundle.min.js.map |
| ./dist/css/bootstrap.min.css | ./assets/css/bootstrap-5.1.3/bootstrap.min.css |
| ./dist/css/bootstrap.min.css.map | ./assets/css/bootstrap-5.1.3/bootstrap.min.css.map |
Next, let’s add links to the newly uploaded files in the site template.
Within _includes/head.html replace the existing link to the CDN hosted bootstrap with the following:
<link href="{{'/assets/css/bootstrap-5.1.3/bootstrap.min.css' | relative_url }}" rel="stylesheet">
The relative_url filter will ensure that the correct path will be rendered, regardless if it’s a developer environment, or the live GitHub Pages site.
In ./_layouts/default.html replace the existing CDN linnk to the Bootstrap Javascript with:
<script src="{{'/assets/js/bootstrap-5.1.3/bootstrap.bundle.min.js' | relative_url }}"></script>
jQuery
Much like our conversion of Bootstrap, hosting jQuery locally is as simple as downloading
the library from their website, and adding it to our assets/js directory. To minimize our bandwidth usage for the site, we’ll download the compressed production version found on the downloads page.
Download file and store it in our project at assets/js/jQuery-3.6.0/jquery-3.6.0.min.js.
Remove any reference to CDN hosted jQuery resources. Inside of _layout/default.html, add a <script> tag right before the closing </body> tag.
<script src="{{'/assets/js/jQuery-3.6.0/jquery-3.6.0.min.js' | relative_url }}"></script>
Font Awesome
Font Awesome is the defactor font library for the web. The “forever free” version is available to anybody but does require you to sign up for an account in order to use a kit. The pro version includes additional icons but does have an annual subscription cost.
Luckily, I was a backer of the Version 5 crowdfunding campaign, which gives me access to the pro version forever - as long as it’s self hosted. Lucky for us - that’s what we’re shooting for!
Following the instructions on “Hosting Font Awesome Yourself”.
Start the upload process by creating the following directory structure:
./assets/fontawesome5/
├── css
├── js
└── webfonts
From the downloaded Font Awesome package, upload the contents of the three subdirectories (css, js, webfonts) into the corresponding directories created in the project.
After the assets are uploaded, it’s time to add the CSS and Javascript declarations to the template so that Font Awesome can be used within the site.
CSS
Add the following block to the _includes/head.html file, within the <head> block:
<link href="{{'/assets/css/fontawesome5/all.css' | relative_url }}" rel="stylesheet">
With Font Awesome now available to our site, let’s use it!
Collection Icons
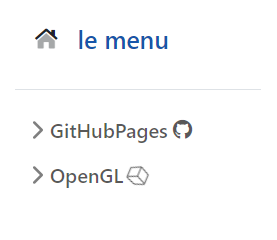
We can spice up the sidebar menu by adding Font Awesome icons to each top level item. Since the menu is defined procedurally, the best place to define what icon to render will be in the _config.yml section for collections.
collections:
  GitHubPages:
    output: true
    permalink: /:collection/:name
    fontawesome: fab fa-github

  OpenGL:
    output: true
    permalink: /:collection/:name
    fontawesome: fal fa-cube fa-spin
The contents of the fontawesome parameter will be used for the class of an <i> element in the sidebar.html file. Let’s take a look at what the new template looks like to render the top level menu button.
./_includes/sidebar.html
    <button class="btn btn-toggle align-items-center rounded collapsed"
            data-bs-toggle="collapse" data-bs-target="#-collapse"
            aria-expanded="false">


</button>
The {% if %} statement is present in the event the fontawesome parameter is not defined for a collection. If it is, it’s used as the class for the <i> element.
Conclusion
With that, we’ve got all of the sites’ dependencies being hosted locally. Going forward, any library used by the site will be hosted locally from the start. Additionally, I’ll be sprinkling Font Awesome icons throughout the site.
Next up: Adding a blog section.