Render a PDF file with Django

Last week, I refactored the physical pin sheet rendering logic of Pin Sheet Pro. The update was to migrate from HTML/CSS based pin sheet rendering over to a PDF format. Turns out, using HTML/CSS for print media is incredibly fragile - or I’m just terrible at it.
Use Case
Pin Sheet Pro supports digital and physical golf hole location sheets. The backend software for the application is developed using the Django Framework. For printing physical copies of the pin sheet, users need to be provided a PDF file that can be easily shared, saved, and printed.
Server-Side
Rendering the pin sheet is done on the server using the Python Image Library, Pillow. For this post, I won’t go into complete details of the rendering logic. What’s important to note is that the image is constructed using a Pillow Image object.
from io import BytesIO
from PIL import Image, ImageDraw

# Construct an image that will serve as page 1 of our document
image = Image.new('RGB', (WIDTH, HEIGHT), 'white')
draw = ImageDraw.Draw(image)

# Draw all of the hole locations and text to the image object
...

# Any additional images (page 2 and onward) are constructed here and appended to the additional_images array
addition_images: list[Image] = []
...
Pillow to PDF
At this point we’ve got an Image object with the first page, stored in image. Any additional pages (Image objects) are stored in the additional_images array.
The next step is to convert the Image objects into a PDF file. Save the image using Image.save().
You’ll note that we aren’t saving the image to disk. Rather, we’re saving it to a BytesIO object, in memory. You’ll see why in the next step.
# Save the image to a BytesIO object
image_io = BytesIO()
image.save(image_io, 'PDF', resolution=300, save_all=True, append_images=additional_images)
Returning an Inline PDF
Instead of displaying an HTML response, our Django view will return a PDF file. The desire is to have the PDF file displayed in a new browser tab.
Two special considerations must be made:
- Set the content type of the response to be a PDF
- Tell the browser to display the content inline and not to save it as a file
The FileResponse class will allow us to easily accomplish those considerations.
def our_pdf_view(request: HttpRequest) -> FileResponse:

    # Image rendering logc goes here
    ...

    return FileResponse(image,
                        as_attachment=False,
                        filename='pinsheet.pdf',
                        content_type='application/pdf')
The BytesIO object is passed in as the file data. as_attachment set to False ensures the HTTP Content-Disposition is set to inline, thus displaying it directly in the browser - opposed to saving it as an attachment. Setting the filename and content_type helps the browser determine what kind of media type is being sent back. PDF, in our case.
Client-Side
With all of the server-side logic complete, let’s turn our focus client-side.
HTML Form
The PDF view will be hit using an HTTP POST request. Our form contains data such as:
- Pin Sheet ID
- Hole orientation (vertical or horizontal)
- Flag to indicate if the course logo should be displayed
- Optional text
<form id="print-form" method="POST" onsubmit="openPrintWindow(event)">
    ...
</form>
Special logic is needed in order to open a new tab with the returned PDF file. That magic is done with a custom onsubmit javascript handler. Let’s take a peek at what that looks like.
Form Submission
The first part of our custom submission handler is to actually submit the form to the server.
All of the form data is stashed into the formData parameter and shipped off to the backend with a call to fetch.
With the response blob data in hand, we make some calls to the window object. The first order of business is to create a local object URL with window.URL.createObjectURL. We’ll then use that URL to open a new browser tab, displaying all of the data returned by the server.
function openPrintWindow(event) {
        event.preventDefault(); // Prevent the default form submission

        // Create a new FormData object to capture the form data
        const formData = new FormData(document.getElementById('print-form'));

        // Send the POST request using fetch

        fetch('{% url "printable_image" pinsheet_id=pinsheet.id %}', {

            method: 'POST',
            body: formData,
            headers: {
                'X-CSRFToken': '' // Include CSRF token in the header
            }
        })
        .then(response => {
            return response.blob();
        })
        .then(blob => {
            const url = window.URL.createObjectURL(blob);
            const newTab = window.open(url, '_blank');
            if (newTab) {
                newTab.focus();
            } else {
                alert('Please allow popups for this website');
            }
        })
        .catch(error => {
            console.error('Error:', error);
            printWindow.close(); // Close the window if there’s an error
        });
    }
End Result
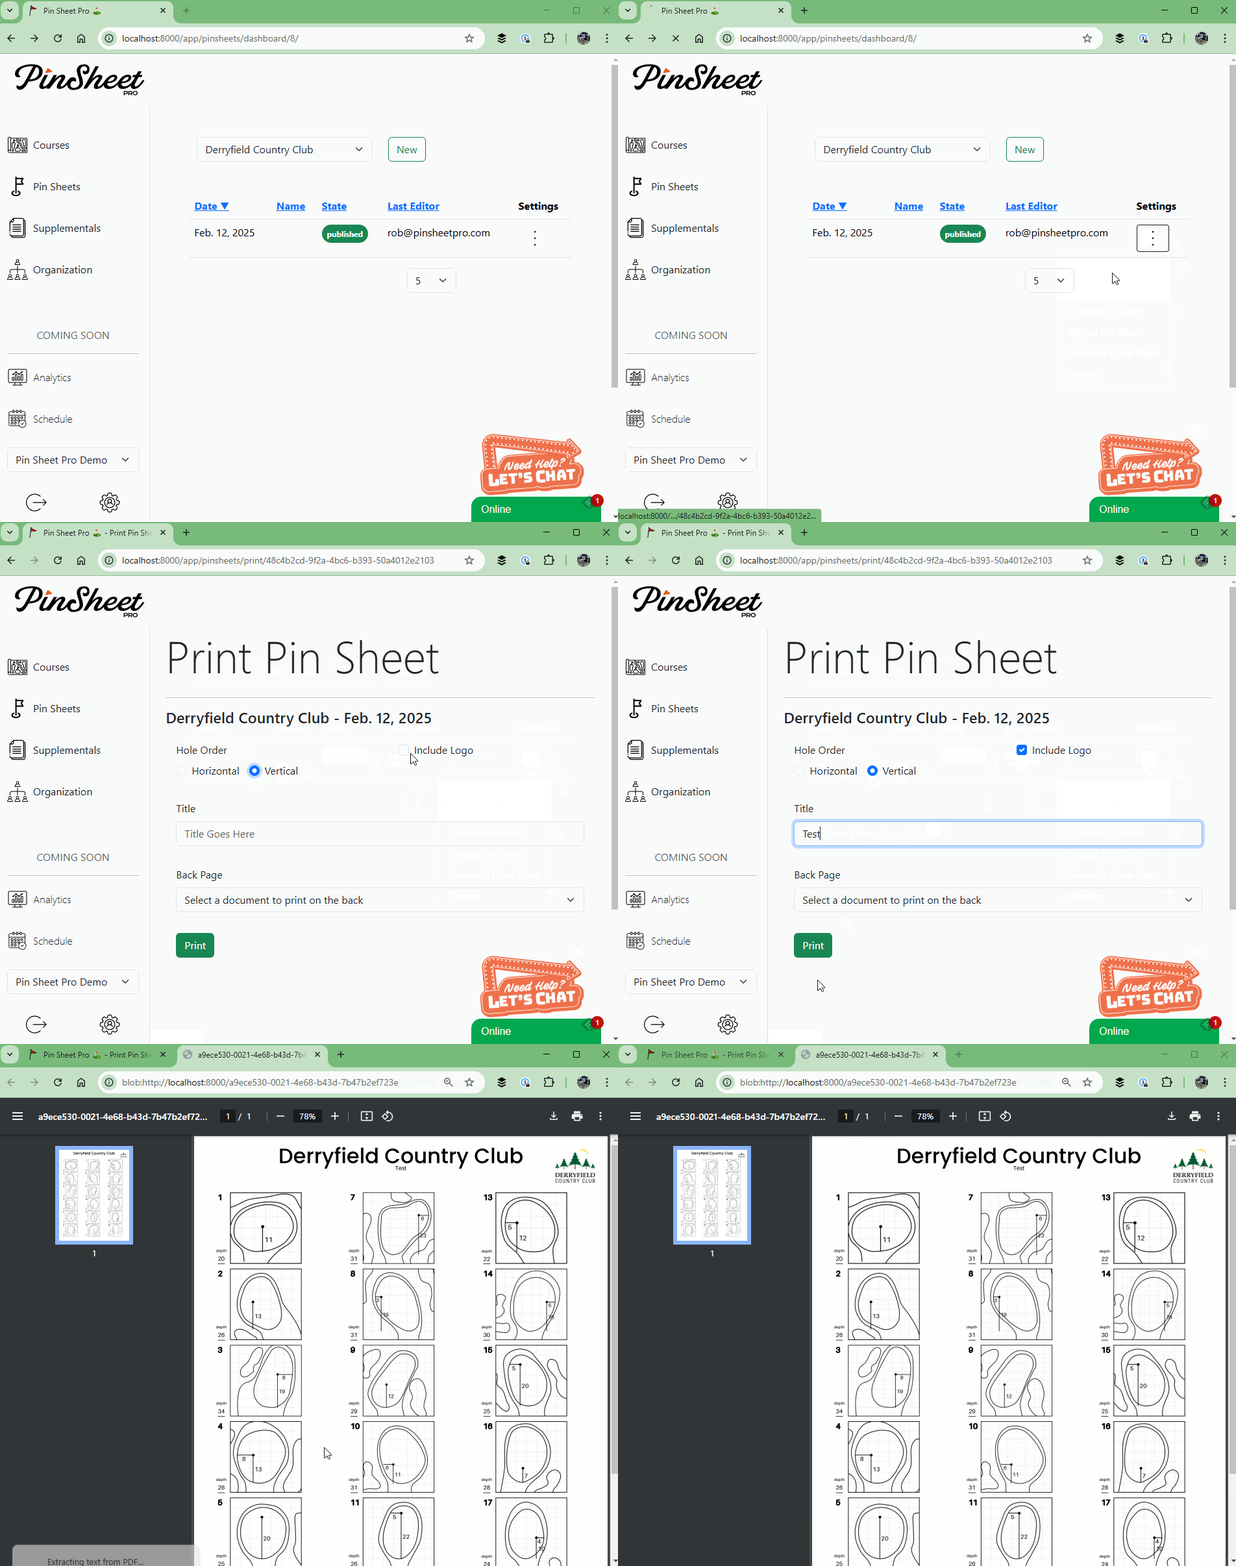
Here is what the final workflow looks like. On the printing page, users select which options to customize. Pin Sheet Pro then opens a new tab with the rendered PDF.
Really happy with how this turned out. We will be adding additional rendering options in the future.
